
RECENT POSTS


The Ultimate Waxed Suede Tutorial
Our friends at Otter Wax have graciously shared an exceptional tutorial with us, unveiling a rather intriguing and distinct method for waxing suede shoes. Dive in and explore this fascinating approach! Note: Prior to proceeding with this process, I highly recommend conducting a test on an older shoe. Try out the waxing process on your own, ensuring you get it right for suede materials. Once you've mastered the correct technique, you can confidently purchase an Alexander Noel shoe or boot and continue with the process. Keep smiling!
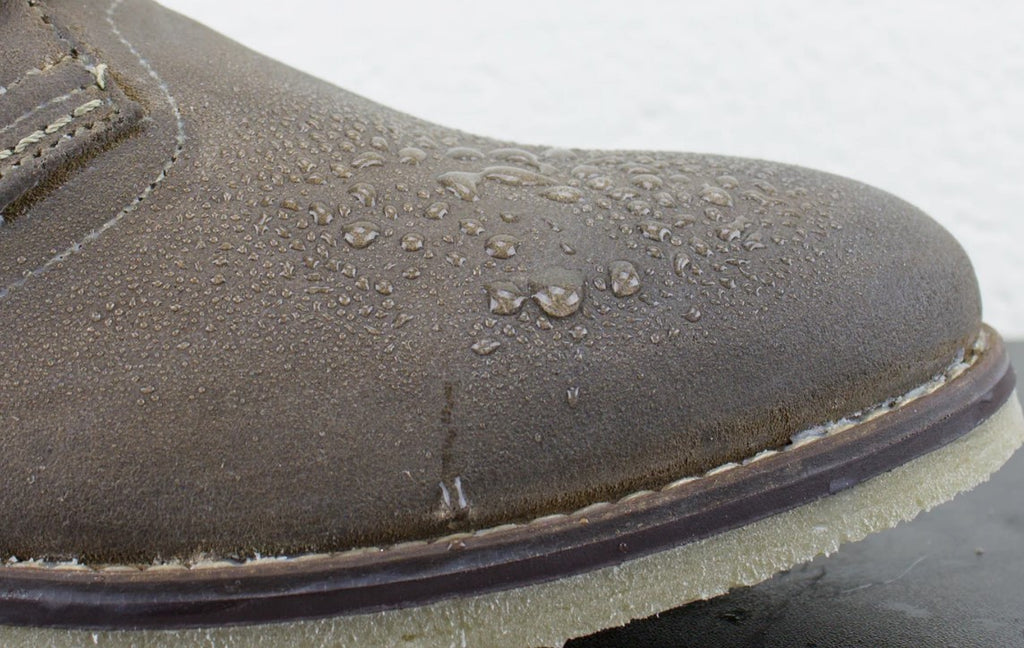
This tutorial is a little different than what we've done in the past since we're actually going to be using our Heavy-Duty Fabric Wax on sueded leather. Truth be told, suede is one of my favorite things to wax because it's going to add a ton of character while also improving on function by making them waterproof. Before we get down to the waxing, it's important to highlight some things about suede that make it different from other types of leather.
During processing, thick cowhides are typically sliced down to three "splits", consisting of top-grain, interior, and underside. While the first two splits are processed into leather that's finished to be all smooth and shiny, the underside split is what's used to make our suede. Just like our own skin, the outer layers of cowhide are tougher than the new skin underneath, which is why these layers are usually used to make firmer, more rigid leathers. In contrast, the underside layer used to make suede has a lot more flexibility, making it ideal for when comfort is a priority. Think of it this way, a black motorcycle jacket made with top-grain leather is usually going to weigh a ton and be really stiff before it's broken in, while a suede jacket is going to be relatively light and flexible right from the start. In addition to all this, suedes have varying degrees of "nap" (the little hairs that stick out from the leather). The length of the nap depends on how it's processed and is usually a good indicator of quality. A really short nap is going to be more expensive but will have a great 'velvety' appearance.
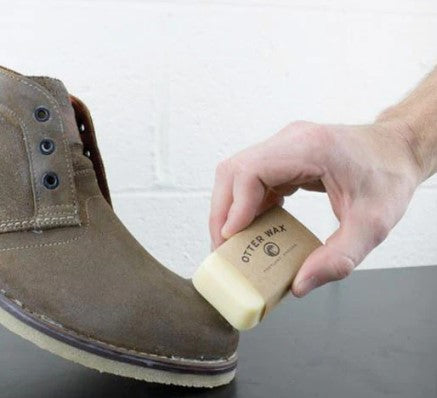
Applying our Heavy-Duty Fabric Wax to suede is relatively straight forward project, however I've thrown in a couple of optional steps depending on what look you want to achieve. From start to finish this project took about 30 minutes and used up about 3/4 of one of our Regular Size Otter Wax bars.
I'd say the suede has a medium nap, but the top part of the boot seems to be made with slightly higher grade. It doesn't really matter though, since the wax we'll be applying is going to lay all of those leather fibers down. One of the things I really like about finishing suede with our wax is how it will take on the appearance of a smooth patent leather, but there's still some degree of texture left, giving it a much more natural look. Wolverine lists the color as Crepe, but they're almost a medium brown. Once waxed, they will darken up considerably.
STEP: 1
REMOVE THE LACES

STEP: 2
STUFF BOOT WITH CRUMPLED SO EVERYTHING IS SUPPORTED EVENLY. I WOULDNT ADVISE SHOE TREES BECAUSE IT WOULD NOT SUPPORT THE TOP HALF OF THE BOOT

STEP: 3
MAKE SURE THE SHOES ARE FREE OF ANY DIRT, DUEST AND DEBRIS. A HORSEHAIR BRUSH DOES A GOOD JOB AND GENTLE ON THE LEATHER

STEP: 4
START RUBBING THE WAX INTO THE SUEDE. USE A LITTLE BIT OF PRESSURE WHILE RUBBING THE BAR BACK AND FORT TO CREATE FRICTION. THIS HELP SOFTEN THE WAX AND MAKES IS SPREAD OUT EASIER

STEP: 5
START BY APPLYING THE WAX TO ONE PART OF THE BOOT AT A TIME.
ONCE IT'S BEEN APPLIER TO MEDIUM SIZE AREA, SMOOTH IT OUT WITH YOUR FINGERS TO CREATE AN EVEN COATING.

STEP: 6
USE THE EDGES OF THE BAR TO REACH DIFFICULT AREAS

STEP: 7
THOROUGHLY COAT THE SEAMS

STEP: 8
TO HELP STREAD THE WAX FASTER, USE A HEAD GUN TO WARM UP THE END OF THE BAR. WHEN THE WAX GETS SHINY FROM MELTING, APPLY DIRECTLY TO THE LEATHER. USE CAUTION TO PREVENT BURNING EITHER YOUSELF OR THE LEATHER. ALWAYS USE ON TH LOWEST SETTING

STEP: 9
WHEN USING A HEAT GUN TO HELP SPREADY THE WAX, YOU'RE GOING TO END UP WITH A PRETTY HEAVY COATHING OF WAX. ATH THIS POINT, YOU MIGHT BE WONDERING WHAT YOU'VE GOTTEN YOURSELF INTO. EVERYTHING IS GOING TO BE JUST FINE ONCE WE MOVE ON TO THE NEXT STEP

STEP: 10
TO CREATE AN EVEN COLORATION, MELT THE WAX INTO THE SUEDE. THE WAX WILL GET SHINY FOR A SECOND AND THEN ABSORB INTO THE SUEDE AS THE BORES OPEN UP FROM THE HEAT

SIDENOTE:
IF YOU LIKE THE IDEA OF A MORE MATTE FINISH, YOU CAN STOP AT THIS POINT. SKIP TO STEP 12 TO SEE HOW TO CLEAN EVERYTHING UP AND GET RIS OF ANY LEFTOVE WAST LEFT IN THOSE HARD-TO-REACH SPOT

STEP 11
TO CREATE AN EVEN COLORATIONS, MELT THE WAX INTO THE SUDE. THE WAX WILL GET SHINY FOR A SECOND AND THEN ABOSB INTO THE SUEDE AS THE PORES OPEN UP FROM THE HEAT.
STEP: 12
USE A WOODEN SMOOTHING TOOL OR SIMILAR ITEM TO REMOVE ANY SPOTS OF LEFTOVER WAX. YOU CAN ALSO SMOOTH OUT ANY AREAS THAT MIGHT BE SLIGHTLY UNEVEN.

STEP 11:
IF YOU WANT THE SUEDE TO HAVE A LITTLE BIT OF A SHINE TO IT YOU CAN ADD ANOTHER LAYER OF WAX. APPLY THE WAX DIRECTLY TO THE LEATHER WITHOUT USING ANY HEAT

STEP 12:
USE A WODDEN SMOOTHING TOOL OR SIMILAR ITEMS TO REMOVE ANY SPOTS OF LEFTOVER WAX. YOU CAN ALSO SMOOTH OUT ANY AREAS THAT MIGHT BE SLIGHT UNEVEN
STEP 13:
APPLY PRESSURE AND USE THE FLAT SIDE OF THE TOOL TO REMOVE WAX FROM SEAMS. THIS HELPS PUSH THE WAX INTO THE SEAM FOR A BETTER SEAL AND REMOVES EXCESS WAX THAT MIGHT HAVE CLUMPBED AROUND THE THREAD

RESULT:
HERE'S THE BEFORE-AND AFTER OF THE WAXED SUDE CHUKKA BOOT. AS TIME PASSES, THESE WILL DEVELOP A GREAT PATINA ON THE PRESSURE POINTS (TOE HEEL, AND SIDES) THE WILL GIVE A LITTLE EXTRA SHINE TO THE FRONT AND SIDES OF THE BOOT
RESULT:
THE FINISHED WAXED BOOT

RESULT:
REAPPLY AS OFTEN OF NECESSARY AS DESIRED

Related post
24
May
17
May
16
May
16
May
16
May
